How to use the Pen Tool:
There are many different ways to select something in Photoshop. I have already gone over the Quick Selection Tool in the Colorization tutorial. This can be a quick and dirty way of doing things, especially when selecting an object that stand out from its background. A more refined and precise way if making a selection is by using the Pen Tool. This tool will let you make a vector path, which can be used for many different things, however in this case we will use it to make a selection.
1. First open your image in Photoshop.
2. Select the Pen Tool from the toolbar. It is typically on the left side.
3. When you click the Pen Tool on your image it will place an anchor point. Place points around your image until you have a rough outline. Usually its best to place points at corners.
4. Next go back to you tool bar and select the Add Anchor Point Tool. This will allow you to add more anchor points and bend the lines to fit the curves of the part you are trying to select.
5. To make a curve click once and don’t move your mouse. Then, after the anchor point is set, you can click it and bend it. If you click, hold, and drag you will get a S-Curve. Which may be applicable in some cases, but not many.
6. When moving the anchor points there will be two lines with dots that will come off the anchor point. These can be moved and adjusted to make the curve more or less intense.
7. Also, if at any point you accidently click off and your anchor points disappear, select the Convert Point Tool. Then click anywhere on your path, and all of your points should reappear.
8. Once you have an accurate path drawn around your object, open or locate the paths panel. You will see the path you drew labeled as work path. If you want you can rename it to save it. Then, look at the bottom of the panel and click the circle with dashed lines. This will load your path as a selection.
9. From here you can make a mask, delete that object, inverse the selection and delete the background. The possibilities are endless.
Here is my final result. I just inversed the selection and deleted the background so the sign was the only thing in the image.

Step 1: 
Step 2:
Step 3:
Step 4: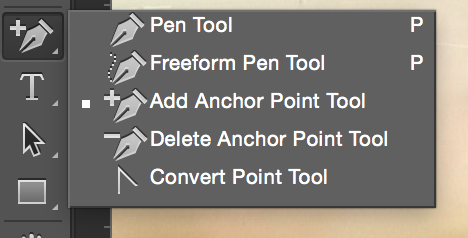
Step 5:
Step 6:
Final:

Step 2:

Step 3:

Step 4:

Step 5:

Step 6:

Final:
